0%

k8s 1.7 闲暇记录

CronJob 一直到 1.8 才开启,1.7 以下的集群需在 apiserver 的启动参数中增加变量,显示开启特定的 api 版本

k8s 中的 job 一般说来需要业务自身做到幂等,或者即使会被重复执行而不影响功能

Job

Job 相比于 StatefulSet / Deployment 的特殊字段

  • .spec.restartPolicy: 仅支持 OnFailed / Never,两种方式控制范围不同,前者当 Pod 容器失败退出时,重启容器,后者当 Pod 容器失败退出时,新建 Pod,会导致 Pod 中的所有容器重启
  • .spec.completions: 完成数,即在 completion 个 pod 执行成功后,认为 Job 完成
  • .spec.parallelism: 并发数,即允许同时执行的 pod 数
  • .spec.activeDeadlineSeconds: Job 执行时间的上限,若超过上限时间仍未完成则 Job 状态变为 DeadlineExceeded,不会再有新的 Pod 被创建,并且已存在的 Pod 将会被删除

通过 completions 和 parallelism 的组合设置,可以达到如下几种 Job 的执行效果

  • 一次性任务

completions =1 && parallelism = 1

  • 固定结束次数任务

completions > 1 && parallelism = 1

  • 并行任务

completions = 1 && parallelism > 1

  • 自定义任务

completions >=1 && parallelism >=1

Job 的接口

1
/apis/batch/v1/namespaces/{namespace}/jobs

Job example yaml

1
2
3
4
5
6
7
8
9
10
11
12
13
14
15
16
17
apiVersion: batch/v1
kind: Job
metadata:
name: busybox
spec:
activeDeadlineSeconds: 100
parallelism: 1
completions: 1
template:
metadata:
name: busybox
spec:
containers:
- name: busybox
image: busybox
command: ["echo", "hello"]
restartPolicy: Never

CronJob

顾名思义,定时任务,支持类似 linux cron 的定时策略,定时调度 Job,可以这么理解 CronJob 控制 Job,而 Job 控制 Pod,Pod 完成具体的业务逻辑

CronJob 的特殊字段

  • .spec.schedule: core of cronjob and it is like one line of a crontab (cron table) file,即定时策略配置,例如 */1 * * * *,每分钟调度一次 Job 执行
  • .spec.startingDeadlineSeconds: 调度 Job 最大开始时间,如果错过任务执行,错过的工作执行将被视为是失败的任务
  • .spec.concurrencyPolicy: Allow/Forbid/Replace,即允许并行执行任务,Forbid 不允许并行执行任务,Replace 取消当前执行的任务,并新建一个任务取代它;考虑任务执行时间较长,而定时间隔较短的情况下,该字段的意义明显
  • .spec.suspend: 暂停调度任务,不影响已调度的任务
  • .spec.successfulJobsHistoryLimit: 保留成功执行的任务记录数
  • .spec.failedJobsHistoryLimit: 保留执行失败的任务记录数

注意 CronJob 在 1.7 中仍然为 Alpha 版本,接口为

1
/apis/batch/v2alpha1/namespaces/{namespace}/cronjobs

CronJob example yaml

1
2
3
4
5
6
7
8
9
10
11
12
13
14
15
16
17
18
apiVersion: batch/v2alpha1
kind: CronJob
metadata:
name: hello
spec:
schedule: "*/1 * * * *"
jobTemplate:
spec:
template:
spec:
containers:
- name: hello
image: busybox
args:
- /bin/sh
- -c
- date; echo Hello from the Kubernetes cluster
restartPolicy: OnFailure

由 CronJob 创建的 Job,在 Job 的 metadata 字段的 ObjectReference 有所体现,会写明是由 cronJob controller 控制

Overview

查看了 job/cronjob 的功能后,我们发现 job 适合用来执行一些初始化 / 统计数据 / 备份 / 清理工作,即那些不需要一直运行的工作,需要长期运行的工作,当然还是 Deployment/StatefulSet 更合适了

how to create a bucket in bbolt

fresh new db file

page 3 (start from 0) is a leaf page, it will be used as a root bucket

1
2
3
4
type bucket struct {
root pgid // page id of the bucket's root-level page
sequence uint64 // monotonically incrementing, used by NextSequence()
}
1
m.root = bucket{root: 3}

bucket 结构表示存储于文件中的 bucket

另外 tx 会关联一个 Bucket 结构体

1
2
3
4
5
6
7
8
9
10
11
12
13
14
type Bucket struct {
*bucket
tx *Tx // the associated transaction
buckets map[string]*Bucket // subbucket cache
page *page // inline page reference
rootNode *node // materialized node for the root page.
nodes map[pgid]*node // node cache
// Sets the threshold for filling nodes when they split. By default,
// the bucket will fill to 50% but it can be useful to increase this
// amount if you know that your write workloads are mostly append-only.
//
// This is non-persisted across transactions so it must be set in every Tx.
FillPercent float64
}

可见其中组合了 bucket 结构体

写事务在初始化时,会使用 meta 锁,锁定住 meta 页的修改;随后将 meta 页拷贝至写事务内部存储;而实际上写事务开启时,会使用 rwlock,因此写事务并不会并发,另仅有写事务会修改 meta 页,所以此处的 meta 页拷贝存疑,似乎没必要

init 方法为 beginTX 内部执行,读写事务都会执行,因此虽然写事务无需 copy meta page 然而读事务需要,因为写事务 commit 之后,会修改 meta page

完成 meta 页的拷贝后,将 tx 的 root (Bucket) 初始化,并设置其 root bucket 为 meta 中的 root bucket; 第一个写事务的 txid 为 2,0、1 用于设置两个 meta 页

1
2
3
4
5
6
7
8
9
10
11
12
13
14
15
for i := 0; i < 2; i++ {
p := db.pageInBuffer(buf[:], pgid(i))
p.id = pgid(i)
p.flags = metaPageFlag
// Initialize the meta page.
m := p.meta()
m.magic = magic
m.version = version
m.pageSize = uint32(db.pageSize)
m.freelist = 2
m.root = bucket{root: 3}
m.pgid = 4
m.txid = txid(i) // 0 1 txid used
m.checksum = m.sum64()
}

create bucket 时 cursor 从 root bucket page 开始遍历 bucket name 应存放的适当位置

branch page 节点 / leaf page 节点

数据存放于 leaf page 节点中

存储于文件中的为 page,内存中的为 node,从文件中读取到的 page 会 materialed 为内存中的 node

机缘巧合,在测试的引导下,读了下 etcd 连接建立方面的代码

etcd 启动后监听 peer url

peer url 通过 mux 绑定 handler,关于 raft 的 url 的请求绑定到 streamHandler 上,这玩意会 hold 住一个连接,除非遇到错误,<-c.closeNotify(),连接 close

啥时候重新 p.attachOutgoingConn(conn) 回来,当然是该成员又请求连接到 url 上来时,即 streamReader 重新连接回来时

streamWriter 使用长链

streamReader 持续读,与 streamWriter 匹配,streamWriter 不遇到错误,不 close 连接;streamReader 断了之后,100ms 重新 dial 一次,重连上后,对端 streamWriter 能 hold 住新的连接

etcd 对其每一个 peer 都会启动 streamReader 和 streamWriter,reader 建立连接后,writer 使用不关闭,reader 有数据时读,writer 有写入时写,保持着连接

所以 etcd peer 间是建立着长链的,可以使用 netstat -anp | grep {etcd_peer_port} 查看 peer 之间的连接建立情况

安全方面的姿势,掌握略有不足,趁着空闲;另外也是为了不仅仅知道,curl 命令访问 https 接口的时候,需要携带三个证书,如此模糊的解释而努力
to be cont.

搜索了一下网上已有很多现有资料,这里就重新回顾一下,当做我自己的姿势了

https://github.com/denji/golang-tls

首先看下 go 语言中,如何实现 server 端 HTTPS/TLS

http://tonybai.com/2015/04/30/go-and-https/

1
2
3
4
5
6
7
8
9
10
11
12
13
14
15
16
17
18
19
20
package main
import (
// "fmt"
// "io"
"net/http"
"log"
)
func HelloServer(w http.ResponseWriter, req *http.Request) {
w.Header().Set("Content-Type", "text/plain")
w.Write([]byte("This is an example server.\n"))
// fmt.Fprintf(w, "This is an example server.\n")
// io.WriteString(w, "This is an example server.\n")
}
func main() {
http.HandleFunc("/hello", HelloServer)
err := http.ListenAndServeTLS(":443", "server.crt", "server.key", nil)
if err != nil {
log.Fatal("ListenAndServe: ", err)
}
}

443 为知名的 HTTPS 服务端口,那么 server.crt、server.key 这两个文件又是如何作用,哪来的呢?

首先解释哪来的问题

使用 openssl 生成私钥

1
2
# Key considerations for algorithm "RSA" ≥ 2048-bit
openssl genrsa -out server.key 2048

or 使用另外一种算法生成的私钥

1
2
3
# Key considerations for algorithm "ECDSA" ≥ secp384r1
# List ECDSA the supported curves (openssl ecparam -list_curves)
openssl ecparam -genkey -name secp384r1 -out server.key

私钥生成好之后,使用私钥生成公钥(x509 自签发 crt)

Generation of self-signed(x509) public key (PEM-encodings .pem|.crt) based on the private (.key)

1
openssl req -new -x509 -sha256 -key server.key -out server.crt -days 3650

所以呢,server.key 是私钥,server.crt 是公钥,生成之后,就可以用来初始化 TLS server 了

前言

最近在给 ETCD cluster on k8s 写 FE (front end),此篇总结一下框架性的东西

很久之前在实验室的时候,曾经蹚水过一段时间 fe 开发,深知 fe 领域目前 一天涌现 100 个开发工具 的节奏,从 angularjs (google) 到 react (facebook),都是 SPA (single page application) 的实践

使用这两框架,对于 fe 小白开发来说,最大好处是省去了大部分 jQuery 手工操作 DOM 的繁杂代码,都由框架代为更新 DOM 元素了。当然也引入了比服务器端渲染页面的经典设计模式 MVC (model view controller),更进一步的 MVVM (model view viewModel) 模式,支持视图到模型,模型到视图的双向数据更新特性。由此 fe 的代码得到极大净化

然而无奈 fe 仍然是个劳动密集型的方向,毕竟是眼见为实,与用户距离最近的东西,一言不合就有需求,就有改动了。因此代码一开始可能是规整的,过了一段时间后,就直接起飞了 …

现实不讨论了,先进入正题

找轮子

不重复造轮子,github 上搜索一把,可以得到很多 startup 项目,找一个 star 比较多的,例如 https://github.com/preboot/angularjs-webpack,直接用该项目来开始好了

1
git clone https://github.com/preboot/angularjs-webpack.git

分析轮子

该项目为 node + angularjs + webpack 的一个极简 demo

node 就不说了,fe 的革命,很大程度由 node 引发

angularjs 呢,mvvm 框架

webpack 简单理解的话,在 java / c++ 等语言中,可以通过 include or import 关键字导入依赖的库,进而在当前模块中使用已实现的方法,避免重复的开发工作。那么在 fe 中 import 依赖的组件,如当前模块依赖的 js / css 代码,webpack 的作用就是理解这些 import 指令,最后将所有代码 打包 成可实际执行的代码

用轮子造车子

项目结构

1
2
3
4
5
6
7
8
├── LICENSE
├── README.md
├── karma.conf.js
├── node_modules
├── package.json
├── postcss.config.js
├── src
└── webpack.config.js

package.json 定义了 node 项目的依赖

通过 npm install 安装 package.json 中定义的依赖到项目下的 node_modules 文件夹下

国内的网络环境一般,需要一些手段加速依赖下载,如淘宝的 npm 镜像站

1
2
3
4
# 安装淘宝定义的 cnpm
npm install -g cnpm --registry=https://registry.npm.taobao.org
# 安装项目依赖
cnpm install

速度可以说是很快了,秒装

webpack.config.js 为 webpack 的配置文件,其中比较重要的配置有

SPA 应用 js 入口

1
2
3
config.entry = isTest ? void 0 : {
app: './src/app/app.js'
};

SPA 应用 page 入口

1
2
3
4
new HtmlWebpackPlugin({
template: './src/public/index.html',
inject: 'body'
}),

base 路径

1
2
3
4
config.devServer = {
contentBase: './src/public',
stats: 'minimal'
};

即在该路径下有一文件,如 ./src/public/hello.png,那么在浏览器中 url/hello.png 能访问到

本地开发时 dev server 的访问地址

1
2
3
// Output path from the view of the page
// Uses webpack-dev-server in development
publicPath: isProd ? '/' : 'http://localhost:8080/',

本地开发

1
2
3
4
// 启动 webpack dev server
npm start
// 浏览器访问 pulicPath 地址即可,如
// http://localhost:8080/

其他的不多说了,此篇质量一般,也是我现在开发 fe 的一个无奈吧,这里增加几句话,那里增加几句话,okay it works,细节不清楚,只是为了完成业务逻辑,当然也因为目前兴趣不在此。详细的可看看 参考 (3)

参考

https://github.com/preboot/angularjs-webpack

https://npm.taobao.org/

http://angular-tips.com/blog/2015/06/using-angular-1-dot-x-with-es6-and-webpack/

to be cont 先写部分吧

MsgProp

Follower 收到 MsgProp 消息时,有成员发起选举,将该请求转发至 Leader;消息先 append 到 raft.msgs slice 中,注意后续所说的消息发送,均为 append 到 msgs 中,并未产生实际发送

MsgApp

Follower 收到 MsgApp 消息时,即有 Entries 写入时,重置 electionElapsed 为 0,设置其 Leader 为消息来的成员的 ID;调用 handleAppendEntries 方法处理 MsgApp 消息;handleAppendEntries 方法中向 m.From 发送 MsgAppResp 消息;消息中包含经过处理 MsgApp 后,当前节点的 Index;冲突时额外返回 Reject: true,RejectHint: lastIndex

maybeAppend: handleAppendEntries 方法中使用到的 maybeAppend 方法分析

(1)

firstIndex 会尝试从 unstable 的 snapshot 中获取 snapshot meta Index,如果 snapshot 为 nil(maybeFirstIndex),则从 storage 中获取 ents[0].Index

(2)

lastIndex 会尝试从 unstable 的 ents 中获取最后一个 entry 的 index,如果 unstable 的 ents 为空,则获取 unstable 的 snapshot meta index(maybeLastIndex),如果仍然获取不到,则从 storage 中获取最后一个 entry 的 Index

看明白最基础的方法 firstIndex 和 lastIndex 后,继续往下

(3)

term 尝试获取 index 为 i 的 entry 的 term,entries 的第一个 index 为 dummy index,即每次收到 MsgApp 消息时,m.Index 为 dummy entry (index),后续为真正的 entries (m.Ents);dummy index <= i <= lastIndex,如果 index i 不位于该范围中,显然无法找到对应的 term;maybeTerm 尝试在 unstable 中获取 index 为 i 的 entry 的 term,unstable 中无法找到的话,从 storage 中查找

(4)

matchTerm(i uint64, term Term) 的实现,首先尝试获取 index i 的 term,随后匹配是否等于 term

(5)

findConflict 的实现,对 ents 中的每个 entry 调用 matchTerm 方法,Index 升序遍历,遇到 unmatch的 (即遇到相同 Index 不同 Term 的 entry 认为 conflict),如果这个 unmatch 的 entry 的 Index <= lastIndex,则有 conflict,返回第一个 conflict entry 的 Index;如果这个 unmatch 的 entry 的 Index > lastIndex,则认为是新的未包含的 entry,则返回第一个新的 entry 的 Index;如果均 match 则返回 0

(6)

maybeAppend(m.Index, m.LogTerm, m.Commit, m.Entries…) 的实现,内部会首先判断 matchTerm(m.Index, m.LogTerm),过了之后,会对每个 entry findConflict,没有 confict 则没啥好添加的,有 conflict,可能是真 conlict 也可能是包含了新的 entries,统一调用 append 方法加入到 unstable 中;注意这是 Follower 的行为,Follower 会使用 Leader 发来的 MsgApp 改写自己本地的 entries;Leader 发来的 MsgApp 中包含了其已经 commited 的 Index 信息,Follower 使用 commited 和 MsgApp 中的最后 Index 中小的那个 Index 作为能 committed 的 index

lastnewi = index + uint64(len(ents))

commitTo(min(commited, lastnewi))

如果 tocommit > l.lastIndex() 会 panic

(7)

综上

  • 接收到 MsgHeartbeat 消息会更新 commited
  • 接收到 MsgApp 消息可能会更新 commited

FAQ: unstable 什么时候会 stable?

在 node 的 main for loop 中,首先会从 raftlog 中获取 ready to apply 的 entries (即 unstable 和 nextEnts),将其放入 readyc 通道后,等待 advancec 通道消息;当外部 apply 结束后,调用 node.Advance() 方法,node 获取到 advancec 通道中的消息,开始执行 raftlog 的 apply 更新 apply index 和 stable to 将 unstable 变为 stable

raftlog 的逻辑图如下 (没写 snapshot 部分)

raftlog

MsgHeartbeat

Follower 收到 MsgHeartbeat 消息时,重置 electionElapsed 为 0,设置其 Leader 为消息来的成员的 ID;commitTo MsgHeartbeat 中的 commited index,并向 Leader 回复 MsgHeartbeatResp 消息

MsgReadIndex

Follower 收到 MsgReadIndex 消息,将请求转发至 Leader;Leader 返回 MsgReadIndexResp 消息,有且仅有 1 Entry,返回已到达一致性的 Index (consistency=l);线性 / 序列化,貌似是个术语待查

Follower 收到 MsgReadIndexResp 消息,有且仅有 1 Entry,将其加入 readStates 中

1
r.readStates = append(r.readStates, ReadState{Index: m.Index, RequestCtx: m.Entries[0].Data})

FAQ: 那么 msgs 什么时候会被发送

回到 node 的 main forloop,在 rd = newReady(r, prevSoftSt, prevHardSt) 方法中会读取 r.msgs,并设置 n.readyc 通道,后续将 rd 放入 readyc 通道中,等待外部消费;外部通过 node.Ready() 方法获得内部需 apply or 待发送的 Messages

在 etcdserver/raft.go 的 main forloop 中获取 readyc 通道消息 rd := <-r.Ready(),该 apply Messages 放入到 r.applyc 通道,该发送的 r.Messages,调用 r.sendMessages(rd.Messages) 发送,结束之后调用 r.Advance()

另外在 etcdserver/server.go 的 main forloop 中获取 ap ap := <-s.r.apply(),将这次 apply 放入 FIFO 中,FIFO 内部协程异步处理 apply job

cursor 从 B tree 的 root 开始,提供 B tree 的遍历和搜索实现,遍历过程记录到 stack 中

遍历

first / prev / next / last 的实现

first 就是不断搜索 element 的 index = 0 inode,直到 leaf page 为止

last 是不断搜索 element 的 index = the count of inodes - 1,直到 leaf page 为止

first 和 last 实现后,可相应实现 prev / next

prev 当 inode 中可 – 时则直接回退一格,若为开头 inode,则上移,再 last

next 当 inode 中可 ++ 时则直接前进一格,若为末尾 indoe,则上移,再 first

搜索

func (c *Cursor) search(key []byte, pgid pgid) {}

nsearch(key)

如果搜到了 leaf page / node,那么就在 inodes 中搜索该 key,返回的 index 为第一个大于等于 key 的 index,若不存在返回 inodes 长度

searchNode(key, n)

如果不是 leaf page / node,且 node 不为 nil (n),则 searchNode;searchNode 中如果 key 相等则从该 inodes[index].pgid,继续 search(key, inodes[index].pgid);如果 key 不相等且 index > 0,则设置为最后一个小于的 index,从该 index 继续 search

searchPage(key, p)

实现同上述,不过是从 page 中读取

获取 node

根据 stack 获取 leaf node,如果已经是 node 且为 leaf 直接返回;不是的话从 stack[0] 开始,遍历到 leaf node,遍历过的 page 都读到 node 并缓存到关联的 bucket 中

获取到 node 之后就可以 put 和 del key 了

总结

所以 cursor 常见操作,由 bucket 创建出来,初始绑定 bucket root,从 root 开始搜索 key 值,返回后,c.node().put or del

例如看个创建 bucket 的过程

1
2
3
4
5
6
7
// Move cursor to correct position.
c := b.Cursor()
k, _, flags := c.seek(key)
var value = bucket.write()
// Insert into node.
key = cloneBytes(key)
c.node().put(key, key, value, 0, bucketLeafFlag)

例如看个写入 key / value 的过程

1
2
3
4
5
6
7
8
9
10
// Move cursor to correct position.
c := b.Cursor()
k, _, flags := c.seek(key)
// Return an error if there is an existing key with a bucket value.
if bytes.Equal(key, k) && (flags&bucketLeafFlag) != 0 {
return ErrIncompatibleValue
}
// Insert into node.
key = cloneBytes(key)
c.node().put(key, key, value, 0, 0)

wal fsync delay warning

对于 leader 来说,可以先行向 follower 发送 messages,再进行 wal 的写入等后续持久化操作,最后 n.advance

对于 follower 来说,必须进行 wal 的写入等持久化操作后,才能向其他成员发送 messages,最后 n.advance

wal 的 fsync 调用

1
2
3
4
5
6
7
8
9
mustSync := mustSync(st, w.state, len(ents))
func mustSync(st, prevst raftpb.HardState, entsnum int) bool {
// Persistent state on all servers:
// (Updated on stable storage before responding to RPCs)
// currentTerm
// votedFor
// log entries[]
return entsnum != 0 || st.Vote != prevst.Vote || st.Term != prevst.Term
}

看的出来 fsync 调用很频繁,每次写入都有 fsync 调用,毕竟每次写入时 entsnum 不为 0

fsync 的对象为最新的 wal 文件

1
2
3
4
5
6
start := time.Now()
err := fileutil.Fdatasync(w.tail().File)
duration := time.Since(start)
if duration > warnSyncDuration {
plog.Warningf("sync duration of %v, expected less than %v", duration, warnSyncDuration)
}

fsync 调用时间超过 1s 会告警,磁盘 IO 有波动了 or 不满足要求

boltdb apply delay warning

wal 写完,raft 协议走通,可同步数据后 apply 数据到本地存储

1
2
3
4
5
6
7
8
9
s.applySnapshot(ep, apply)
st := time.Now()
s.applyEntries(ep, apply)
d := time.Since(st)
entriesNum := len(apply.entries)
if entriesNum != 0 && d > time.Duration(entriesNum)*warnApplyDuration {
plog.Warningf("apply entries took too long [%v for %d entries]", d, len(apply.entries))
plog.Warningf("avoid queries with large range/delete range!")
}

平均 apply 一个 entry 耗时 100ms,*如果 apply 总时间超过 n * 100ms 则告警*

比如 put 请求,最后调到 kvstore.go 的 put 方法,kvindex (B tree) 中搜索一把,再用 boltdb tx 写入一把,kvindex 增加一把,有 lease 的加 lease

当然上述的都是耗时,只不过 boltdb put 的耗时一般而言比其他的操作都大

leader send out heartbeat delay warning

在 r.sendMessages(rd.Messages) 方法中,也会打印延时告警日志

1
2
3
4
5
6
7
8
9
10
// a heartbeat message
if ms[i].Type == raftpb.MsgHeartbeat {
// exceed maxDuration time
ok, exceed := r.td.Observe(ms[i].To)
if !ok {
// TODO: limit request rate.
plog.Warningf("failed to send out heartbeat on time (exceeded the %v timeout for %v)", r.heartbeat, exceed)
plog.Warningf("server is likely overloaded")
}
}

这个地方的算法,是超过 2*hearbeat 时间作为 exceed 时间

leader 将这些 Message 先行发送给 followers,如果是心跳消息,则计算当前时间 - 上次记录的时间是否超过了 2*hearbeat,如果是,则打印超过的值;需注意该值如果接近或超过了 election timeout 时间,则会引发其他成员发起选举,导致集群不稳定

一般这个告警,是由 wal fsync delay 诱发的,而 wal fsync delay 又与磁盘 IO 有关;另外 apply 不是也有 delay 的 warning ?为啥它的影响不大,答:因为 apply 会走 fifo 的调度,是异步的;当然也是有影响的,总会影响整体时延

1
2
3
case ap := <-s.r.apply():
f := func(context.Context) { s.applyAll(&ep, &ap) }
sched.Schedule(f)

放入队列就跑

1
2
3
4
5
6
// Schedule schedules a job that will be ran in FIFO order sequentially.
func (f *fifo) Schedule(j Job) {
...
f.pendings = append(f.pendings, j)
...
}

the clock difference againset peer is too high warning

peer 间计算时差大于 1s 告警,ps: 当前 peer 比对端 peer 时间大

etcd 会将其每个 peer 加入到 probe 中,定时发起 get 请求,一方面可以探测 peer health 另一方面通过其返回值,计算 peer 之间的时间差;没发现该 warning 会对业务造成影响;还没过代码,和时间相关的实现也就 lease 了,暂且推测 lease 用的是逻辑时钟,所以没影响

1
2
3
4
5
6
7
8
func monitorProbingStatus(s probing.Status, id string) {
...
if s.ClockDiff() > time.Second {
plog.Warningf("the clock difference against peer %s is too high [%v > %v]", id, s.ClockDiff(), time.Second)
}
rtts.WithLabelValues(id).Observe(s.SRTT().Seconds())
...
}

probe (4s) 及 monit (30s) 周期

1
2
proberInterval           = ConnReadTimeout - time.Second (5 - 1)
statusMonitoringInterval = 30 * time.Second

开始记录值,start 为本次开始 probe 的时间,hh.Now 为对端 peer 返回的时间

1
2
α = 0.125
s.record(time.Since(start), hh.Now)

时差计算方法

1
2
3
4
5
6
7
8
9
10
// srtt init 0
func (s *status) record(rtt time.Duration, when time.Time) {
s.mu.Lock()
defer s.mu.Unlock()
s.total += 1
s.health = true
s.srtt = time.Duration((1-α)*float64(s.srtt) + α*float64(rtt))
s.clockdiff = time.Now().Sub(when) - s.srtt/2
s.err = nil
}

大概来说就是 local time 减掉 peer time,再减修正时间

to be cont.

bucket -> key/value

Cursor 是内存的概念,记录遍历到 leaf page 的路径

bucket 初始关联了一个 root page,为 db meta page

相关代码,beginTX or beginRWTx 都会有调用

1
2
3
4
5
6
7
8
9
10
11
12
func (tx *Tx) init(db *DB) {
...
tx.root.bucket = &bucket{}
...
*tx.root.bucket = tx.meta.root
...
// 可见读事务不增加 txid,仅读写事务增加
if tx.writable {
tx.pages = make(map[pgid]*page)
tx.meta.txid += txid(1)
}
}

看下 Cursor 的 search 实现

1
2
3
4
5
6
7
8
9
10
11
12
13
14
15
16
17
18
19
20
// search recursively performs a binary search against a given page/node until it finds a given key.
func (c *Cursor) search(key []byte, pgid pgid) {
// 该 pgid 可能在 page or node 中
p, n := c.bucket.pageNode(pgid)
if p != nil && (p.flags&(branchPageFlag|leafPageFlag)) == 0 {
panic(fmt.Sprintf("invalid page type: %d: %x", p.id, p.flags))
}
e := elemRef{page: p, node: n}
c.stack = append(c.stack, e)
// If we're on a leaf page/node then find the specific node.
if e.isLeaf() {
c.nsearch(key)
return
}
if n != nil {
c.searchNode(key, n)
return
}
c.searchPage(key, p)
}

page 和 node

Once the position is found, the bucket materializes the underlying page and the page’s parent pages into memory as “nodes”

Bucket 的数据结构

1
2
3
4
5
6
7
8
9
10
11
12
13
14
15
// Bucket represents a collection of key/value pairs inside the database.
type Bucket struct {
*bucket
tx *Tx // the associated transaction
buckets map[string]*Bucket // subbucket cache
page *page // inline page reference
rootNode *node // materialized node for the root page.
nodes map[pgid]*node // node cache
// Sets the threshold for filling nodes when they split. By default,
// the bucket will fill to 50% but it can be useful to increase this
// amount if you know that your write workloads are mostly append-only.
//
// This is non-persisted across transactions so it must be set in every Tx.
FillPercent float64
}

bucket 的数据结构

1
2
3
4
5
6
7
8
// bucket represents the on-file representation of a bucket.
// This is stored as the "value" of a bucket key. If the bucket is small enough,
// then its root page can be stored inline in the "value", after the bucket
// header. In the case of inline buckets, the "root" will be 0.
type bucket struct {
root pgid // page id of the bucket's root-level page
sequence uint64 // monotonically incrementing, used by NextSequence()
}

继续过 Cursor 的 search 实现: 根据 pageid 获取到 page 或者 node,如果是 page 类型且为 branch or leaf page 则记录到 Cursor 遍历过的 stack 中,否则 panic;node 类型直接记录;判断是否为 leaf (page or node),是的话,在其中 nsearch(key);nsearch 取出 stack 中最后一个 ele,如果 node 不为空,则搜索 node 中的 inode,是否存在该 key

1
2
3
4
5
6
7
8
9
if n != nil {
// 二分查找;如果没找到返回 len(n.inodes)
index := sort.Search(len(n.inodes), func(i int) bool {
// <
return bytes.Compare(n.inodes[i].key, key) != -1
})
e.index = index
return
}

page 类型的话,将 ptr 转换为 *[0x7FFFFFF]leafPageElement 数组,即 inodes,在其中二分搜索 key 值

1
2
3
4
5
inodes := p.leafPageElements()
index := sort.Search(int(p.count), func(i int) bool {
return bytes.Compare(inodes[i].key(), key) != -1
})
e.index = index

如果 ele 不是 leaf 元素的话,那么只能继续从 node 中查找了 c.searchNode(key, n)

看到这里,记录下 node 的数据结构,越来越接近 B+ tree 的真相了

1
2
3
4
5
6
7
8
9
10
11
12
// node represents an in-memory, deserialized page.
type node struct {
bucket *Bucket
isLeaf bool
unbalanced bool
spilled bool
key []byte
pgid pgid
parent *node
children nodes
inodes inodes
}

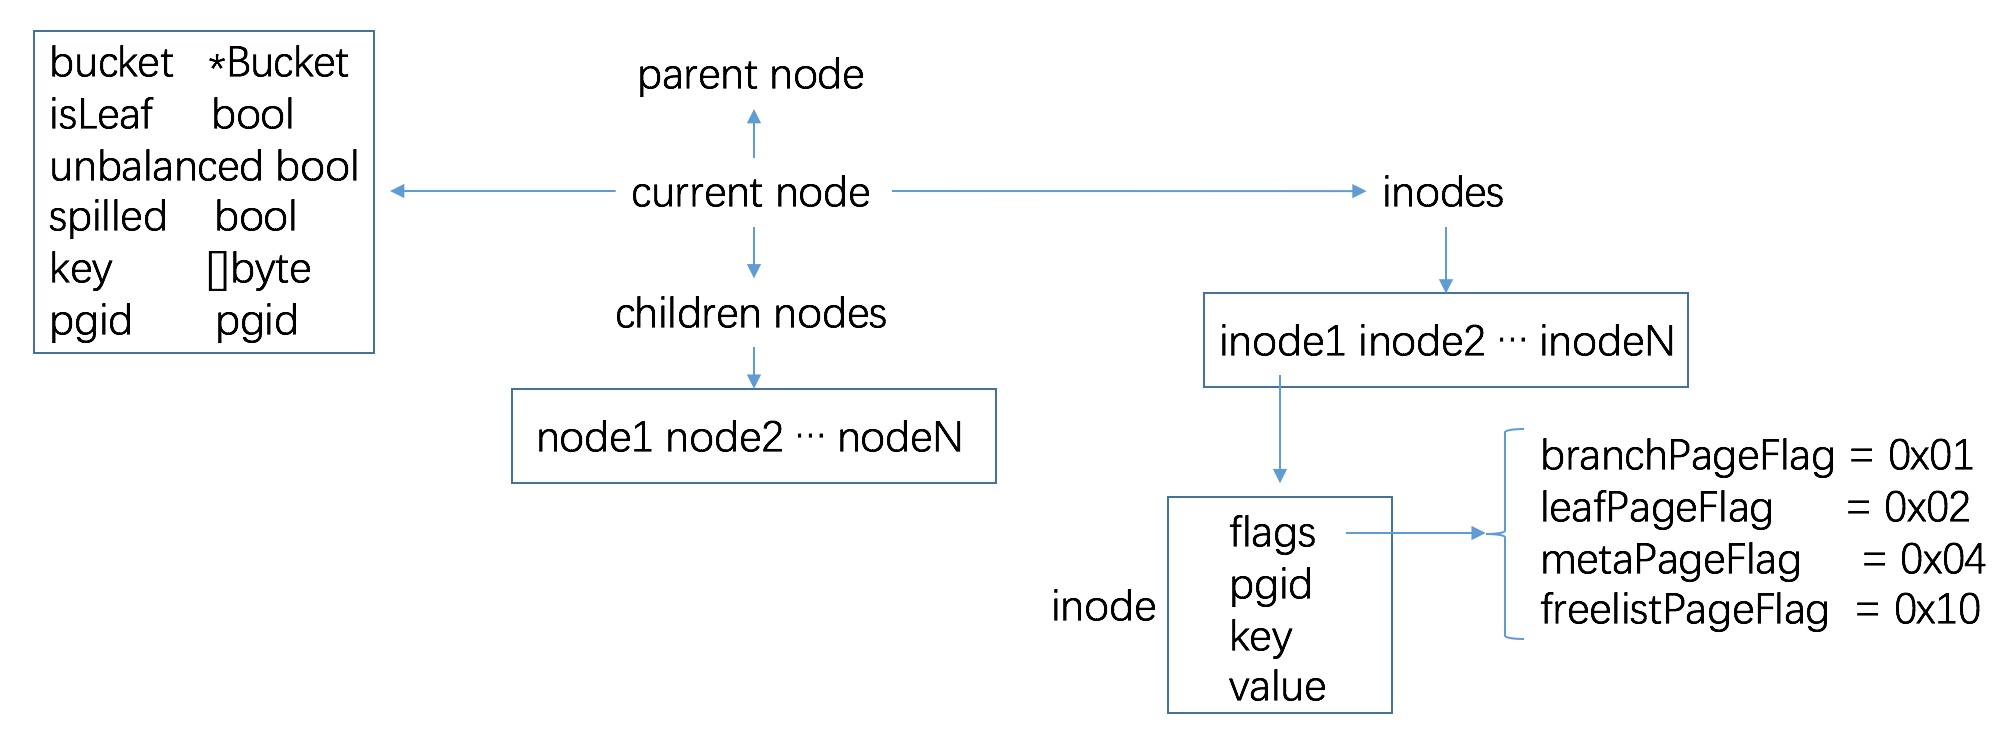
node 树状关系如图,直觉其中的 pgid 对应的是底层的 page,即 mmap db 文件出来的 byte[] array 中的一块

node-graph

node 的 inodes 数目存储在 page.count 中,下面的代码从 read 中摘出

1
2
3
4
5
6
// read initializes the node from a page.
func (n *node) read(p *page) {
...
n.inodes = make(inodes, int(p.count))
...
}

branchPage 中只有 key; leafPage 中有 key 和 value

node 中的 key 存储着其第一个 inode 的 key 值;当然如果其没有 inode 则为 nil

1
2
3
4
5
6
7
// Save first key so we can find the node in the parent when we spill.
if len(n.inodes) > 0 {
n.key = n.inodes[0].key
_assert(len(n.key) > 0, "read: zero-length node key")
} else {
n.key = nil
}

node split,将 inodes 拆分至符合 fillPercent,parent node 的 inodes 也需要添加这些拆分出来的 nodes;还不是特别理解,这么下去的话 root node 岂不是包含所有的 inode,B+ tree 是这么设计的?还不是特别明白

Dream Of A Dream —— “人言南柯一梦,领略了繁华沧桑,谁人过往不相似”

etcd v3.1.9 boltdb pending pages 回收策略

etcdv3 中 backend 使用 boltdb 实现

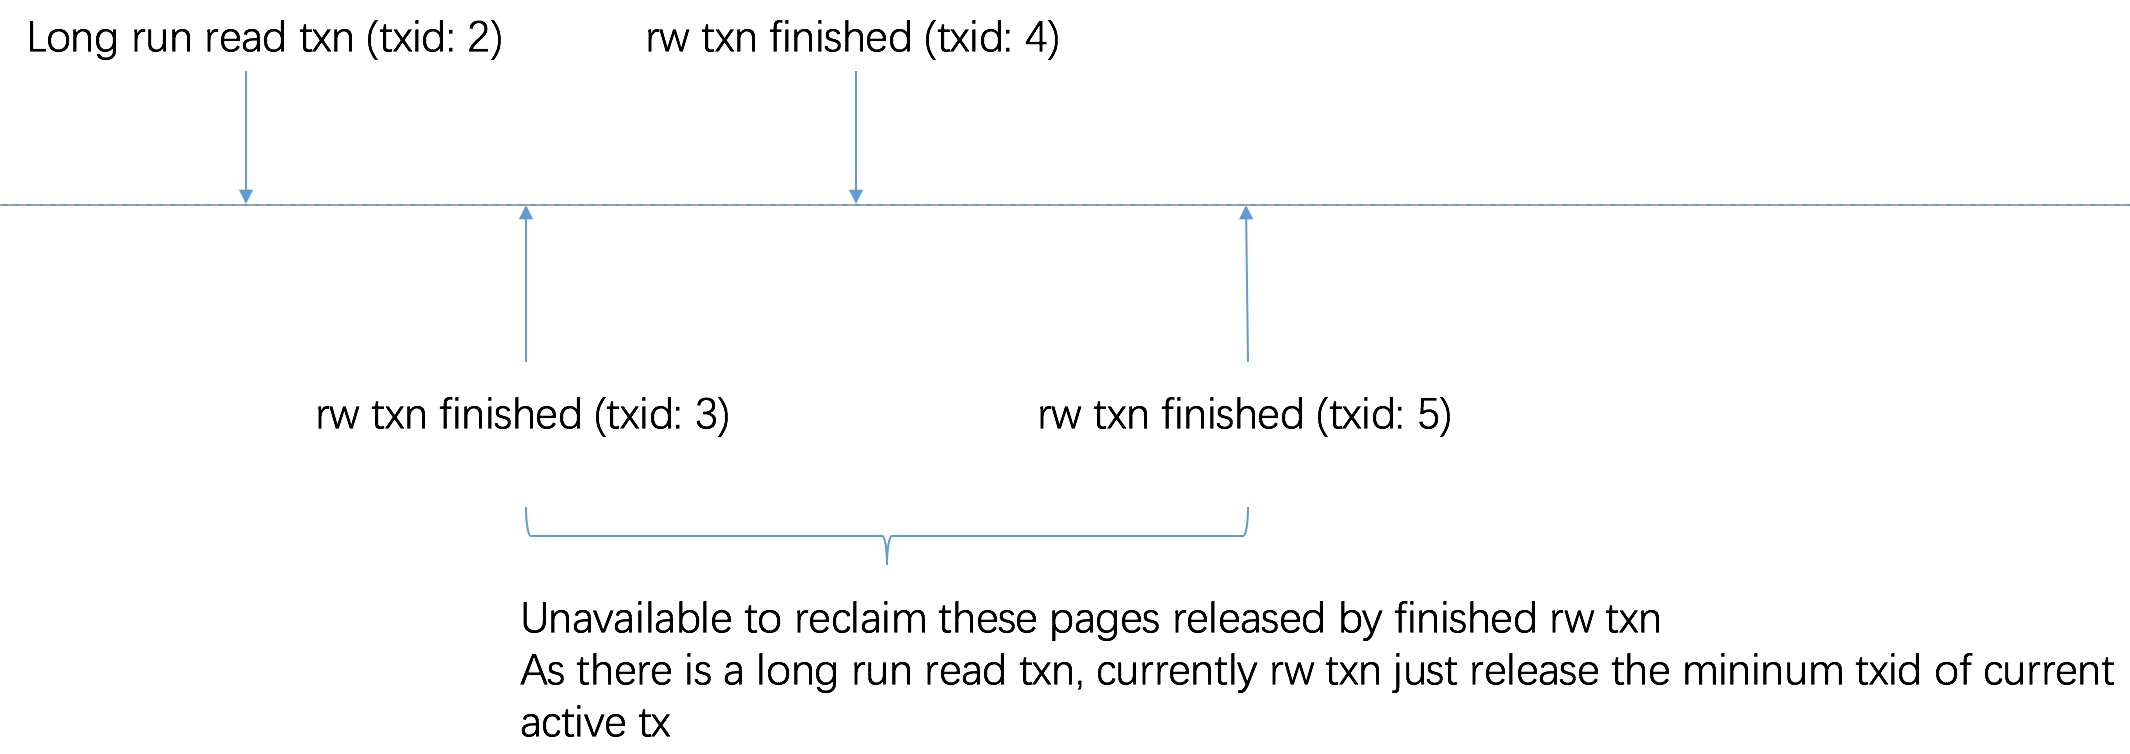
在 etcdv3.1.9 集成的 boltdb 版本中,仅在 freelist 中记录可释放的 page id (pending: [txid] -> page ids),在 rw txn 中释放当前 txn 中最小 txid 之前的 pending pages[1],因此如果有一个 read txn 运行时间过长,会导致部分 pages 无法及时回收使用,导致 db 大小增加。示意图如下

leak-of-pages

1
[1] func (db *DB) beginRWTx() (*Tx, error) {} // 在该方法中释放 pending pages

mock 代码也很好写,随手写了个示例 (为了效果更明显,在 tx 的 Commit 方法中输出了 freelist 的情况)

1
2
3
4
5
6
func (tx *Tx) Commit() error {
...
fmt.Printf("freelist pending_cnt: %d, freelist free_cnt: %d\n", tx.db.freelist.pending_count(), tx.db.freelist.free_count())
p, err := tx.allocate((tx.db.freelist.size() / tx.db.pageSize) + 1)
...
}

正式的 mock 代码: 在一个 read txn 中 “休息” 一会儿,同时不断的开启 rw txn 写数据

1
2
3
4
5
6
7
8
9
10
11
12
13
14
15
16
17
18
19
20
21
22
23
24
25
26
27
28
29
30
31
32
33
34
35
36
37
38
39
40
41
42
43
44
45
46
47
48
49
50
51
52
package main
import (
"fmt"
"log"
"os"
"os/signal"
"syscall"
"time"
"github.com/boltdb/bolt"
)
func main() {
// Open the my.db data file in your current directory.
// It will be created if it doesn't exist.
db, err := bolt.Open("frag.db", 0600, nil)
if err != nil {
log.Fatal(err)
}
defer db.Close()
db.Update(func(tx *bolt.Tx) error {
_, err := tx.CreateBucketIfNotExists([]byte("MyBucket"))
if err != nil {
return err
}
return err
})
go func() {
db.View(func(tx *bolt.Tx) error {
fmt.Printf("start of long run read txn\n")
fmt.Printf("read txn txid: %d\n", tx.ID())
bucket := tx.Bucket([]byte("MyBucket"))
bucket.Get([]byte("answer"))
<-time.After(10 * time.Second)
fmt.Printf("end of long run read txn\n")
return nil
})
}()
mockValue := make([]byte, 1024)
for i := 0; i < 64; i++ {
db.Update(func(tx *bolt.Tx) error {
fmt.Printf("rw txn txid: %d\n", tx.ID())
b := tx.Bucket([]byte("MyBucket"))
err = b.Put([]byte("answer"), mockValue)
return err
})
}
c := make(chan os.Signal, 2)
signal.Notify(c, os.Interrupt, syscall.SIGTERM)
go func() {
<-c
os.Exit(1)
}()
}

运行三次之后,效果明显 (见如下控制台输出) ,read txn 未退出时 pending_count 增加,退出之后,free_count 总量增加,然而此时 db 文件已经扩展增大了,即总的可用页数增加了

1
2
3
4
5
6
7
8
9
10
11
12
13
14
15
16
17
18
19
20
21
22
23
24
25
26
freelist pending_cnt: 1, freelist free_cnt: 12
rw txn txid: 133
freelist pending_cnt: 3, freelist free_cnt: 10
start of long run read txn
read txn txid: 132
rw txn txid: 134
freelist pending_cnt: 6, freelist free_cnt: 7
rw txn txid: 135
freelist pending_cnt: 9, freelist free_cnt: 4
rw txn txid: 136
freelist pending_cnt: 12, freelist free_cnt: 1
rw txn txid: 137
freelist pending_cnt: 15, freelist free_cnt: 0
rw txn txid: 138
freelist pending_cnt: 18, freelist free_cnt: 0
rw txn txid: 139
freelist pending_cnt: 21, freelist free_cnt: 0
rw txn txid: 140
freelist pending_cnt: 24, freelist free_cnt: 0
rw txn txid: 141
end of long run read txn
freelist pending_cnt: 27, freelist free_cnt: 0
rw txn txid: 142
freelist pending_cnt: 3, freelist free_cnt: 25
rw txn txid: 143
freelist pending_cnt: 3, freelist free_cnt: 25

当然 long run read txn,会获取 mmap 读锁,因此当 rw txn 需要 mmap 写锁以扩大存储空间时,会阻塞

1
Read-only transactions and read-write transactions should not depend on one another and generally shouldn’t be opened simultaneously in the same goroutine. This can cause a deadlock as the read-write transaction needs to periodically re-map the data file but it cannot do so while a read-only transaction is open. https://github.com/boltdb/bolt#transactions

为了优化这个点儿,当然也因为 boltdb 原作者不干了,coreos 的大佬们自己拉了一个库继续搞,就是 https://github.com/coreos/bbolt,这个新库在它的第二个合入 pr https://github.com/coreos/bbolt/pull/3 中尝试解决这个问题

附赠一个删除 key 之后空间不会变小的解释,直觉来理解的话,boltdb 是 page 管理的空间,底层空间是连续的,boltdb 将这个空间逻辑上划分为一个个页

bbolt 优化后的回收策略

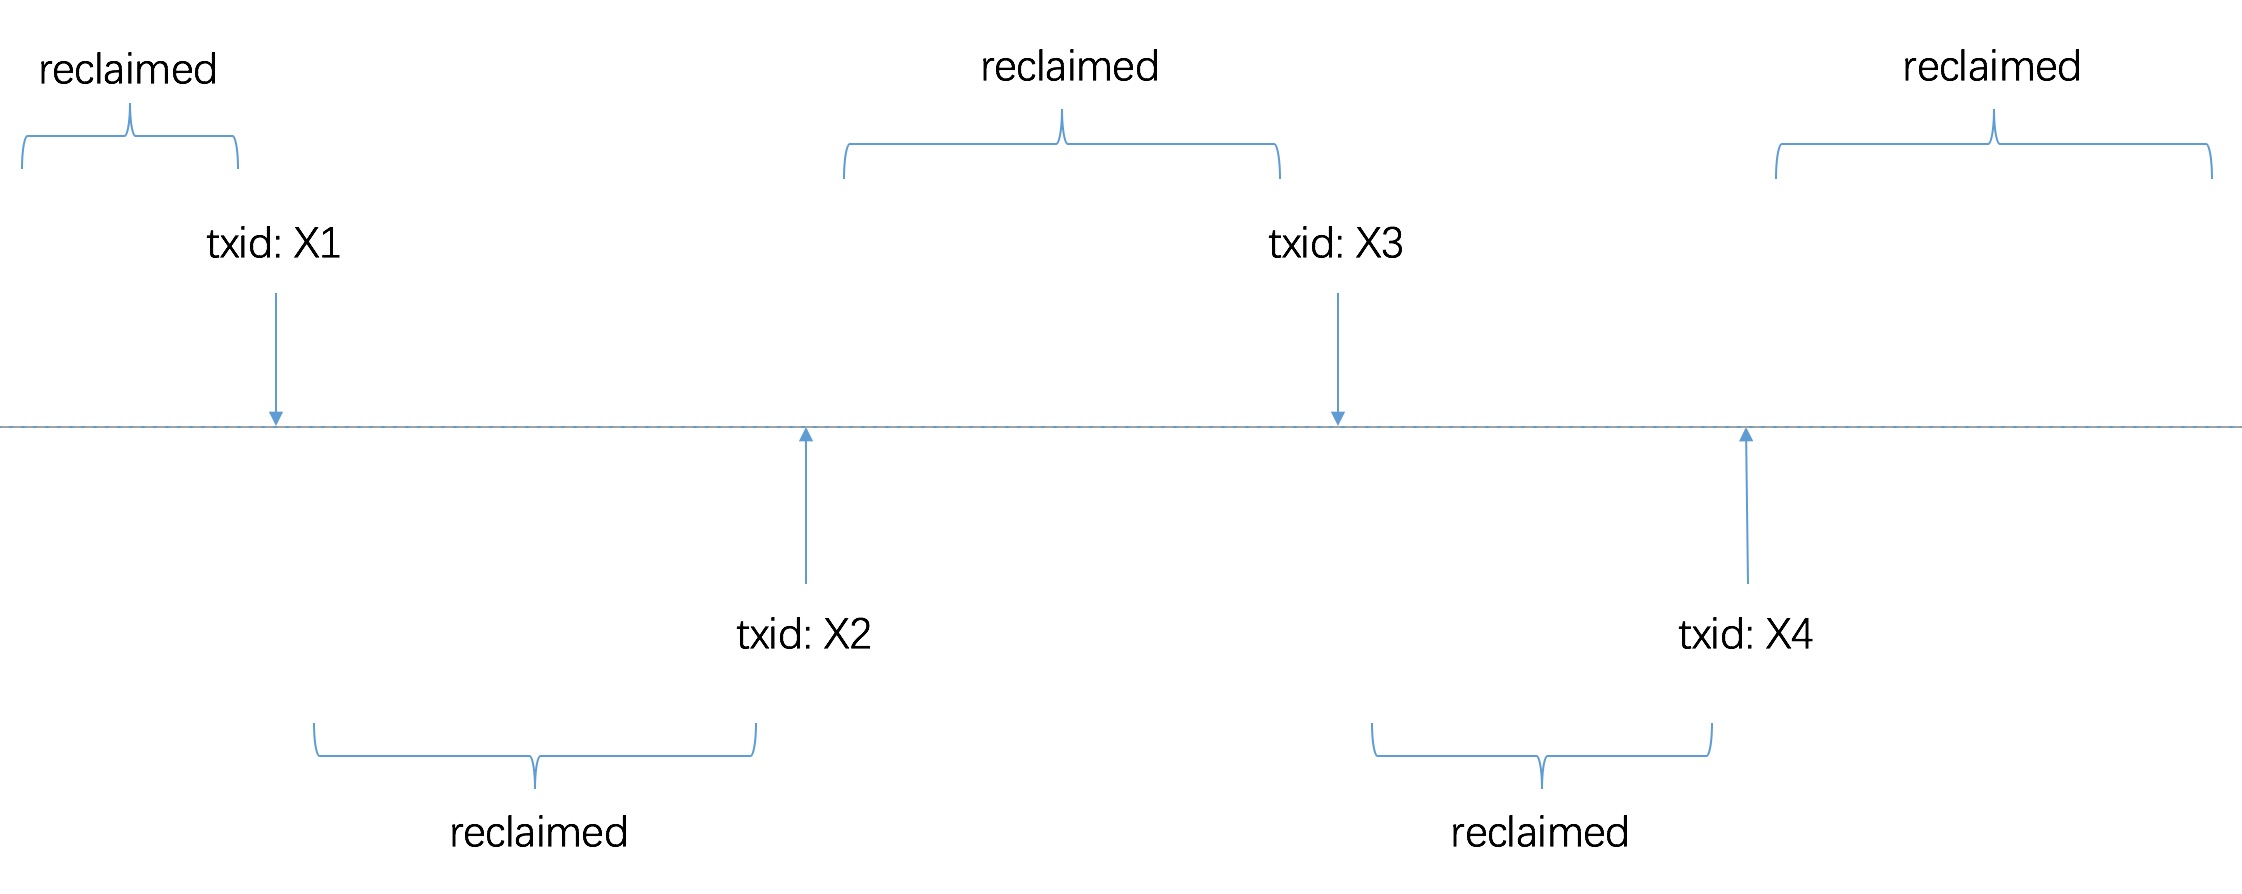
粗略过了一遍代码,总之之前是只能释放当前最小 txn 之前的 pending pages 对吧,现在不管你,能释放的我都释放掉不就行了?示意图如下

free-pages

为了实现这个方案,当然要增加一些记录值,修改一些实现,下面详细看一下这个 pr https://github.com/coreos/bbolt/pull/3/files

1
2
3
4
5
6
7
8
9
10
11
12
13
14
15
16
17
18
19
20
21
22
23
24
25
26
// freePages releases any pages associated with closed read-only transactions.
func (db *DB) freePages() {
// Free all pending pages prior to earliest open transaction.
// txid 升序排序
sort.Sort(txsById(db.txs))
minid := txid(0xFFFFFFFFFFFFFFFF)
if len(db.txs) > 0 {
minid = db.txs[0].meta.txid
}
// 释放最小 txid 之前的 pengding pages
if minid > 0 {
db.freelist.release(minid - 1)
}

// Release unused txid extents.
// 释放 tx 之间的 pending pages
for _, t := range db.txs {
db.freelist.releaseRange(minid, t.meta.txid-1)
minid = t.meta.txid + 1
}

// 释放当前最大 txid 之后的 pending pages
db.freelist.releaseRange(minid, txid(0xFFFFFFFFFFFFFFFF))
// Any page both allocated and freed in an extent is safe to release.
// 假设在 rw txn 之间频繁的有 long run 的 read txn,这个优化很有效
}

原 freelist pending 为 [txid] -> []pgid 的映射,现修改为 [txid] -> txPending{} 的映射

1
2
3
4
5
6
7
8
type txPending struct {
// []pgid 与 []txid 对应
// 每 append 一个 pgid 则 append 一个 txid
// 以记录该 pgid 是在哪个 tx 中被分配
ids []pgid
alloctx []txid // txids allocating the ids
lastReleaseBegin txid // beginning txid of last matching releaseRange
}

freelist 增加一个记录 allocs: map[pgid] -> txid

1
2
3
4
5
6
7
8
9
10
// freelist represents a list of all pages that are available for allocation.
// It also tracks pages that have been freed but are still in use by open transactions.
type freelist struct {
ids []pgid // all free and available free page ids.
// 记录每次 allocate 返回的 page id 与 txid 的对应关系
// allocate 返回的是连续分配的第一个 page id
allocs map[pgid]txid // mapping of txid that allocated a pgid.
pending map[txid]*txPending // mapping of soon-to-be free page ids by tx.
cache map[pgid]bool // fast lookup of all free and pending page ids.
}

freelist allocate 方法增加 txid 参数,用以记录 tx 分配的 page

1
2
3
4
5
6
7
8
// allocate returns the starting page id of a contiguous list of pages of a given size.
// If a contiguous block cannot be found then 0 is returned.
func (f *freelist) allocate(txid txid, n int) pgid {
...
// 记录;仅记录分配的连续 page 的第一个 page id
f.allocs[initial] = txid
...
}

修改 freelist free 方法内部实现

1
2
3
4
5
6
7
8
9
10
11
12
13
14
15
16
17
18
19
20
21
22
23
24
25
26
27
28
29
30
31
32
33
34
35
36
37
38
// free releases a page and its overflow for a given transaction id.
// If the page is already free then a panic will occur.
func (f *freelist) free(txid txid, p *page) {
if p.id <= 1 {
panic(fmt.Sprintf("cannot free page 0 or 1: %d", p.id))
}
// Free page and all its overflow pages.
txp := f.pending[txid]
if txp == nil {
txp = &txPending{}
f.pending[txid] = txp
}
// 获取是分配给哪个 tx 使用的
allocTxid, ok := f.allocs[p.id]
if ok {
// 解除关联关系
delete(f.allocs, p.id)
} else if (p.flags & (freelistPageFlag | metaPageFlag)) != 0 {
// Safe to claim txid as allocating since these types are private to txid.
// 这两种页类型没记录
allocTxid = txid
}

// 释放连续页
for id := p.id; id <= p.id+pgid(p.overflow); id++ {
// Verify that page is not already free.
if f.cache[id] {
panic(fmt.Sprintf("page %d already freed", id))
}
// Add to the freelist and cache.

// ids 与 alloctx 对应
txp.ids = append(txp.ids, id)
txp.alloctx = append(txp.alloctx, allocTxid)

f.cache[id] = true
}
}

freelist 增加 releaseRange 实现

1
2
3
4
5
6
7
8
9
10
11
12
13
14
15
16
17
18
19
20
21
22
23
24
25
26
27
28
29
30
31
32
33
34
35
36
37
38
39
40
41
42
43
// releaseRange moves pending pages allocated within an extent [begin,end] to the free list.
// ps: [begin, end]
func (f *freelist) releaseRange(begin, end txid) {
if begin > end {
return
}
var m pgids
for tid, txp := range f.pending {
if tid < begin || tid > end {
continue
}
// Don't recompute freed pages if ranges haven't updated.
// 已处理
if txp.lastReleaseBegin == begin {
continue
}
for i := 0; i < len(txp.ids); i++ {
if atx := txp.alloctx[i]; atx < begin || atx > end {
continue
}
m = append(m, txp.ids[i])
// 这个实现是够省事儿的
// 如果该 page 能释放,则直接移除
// ids 和 alloctx 数组前移一位
// i-- 以便下次循环保持
txp.ids[i] = txp.ids[len(txp.ids)-1]
txp.ids = txp.ids[:len(txp.ids)-1]
txp.alloctx[i] = txp.alloctx[len(txp.alloctx)-1]
txp.alloctx = txp.alloctx[:len(txp.alloctx)-1]
i--
}
// 该 txid 的 txp 在该 range 已处理
txp.lastReleaseBegin = begin
// 如果均可以释放,则从 pending 中移除
if len(txp.ids) == 0 {
delete(f.pending, tid)
}
}
// 排序
sort.Sort(m)
// 归并排序合入可用 ids
f.ids = pgids(f.ids).merge(m)
}

回过头来梳理 freelist 中的各种映射

pending [txid] -> txPending

而 txPending 中又会存储 ids 和 alloctx,而看 releaseRange 中的实现,这个 alloctx 与 txid 不一定是一致的,那这个 txPending 是在哪儿修改的 ?

问题: txPending 在哪儿被修改

其实刚才我们已经看到了,其在 func (f *freelist) free(txid txid, p *page) 方法中被修改,那么 free 功能又是啥?

  1. free(txid txid, p *page)
  2. 获取 txPending (txp := f.pending[txid])
  3. 获取分配该 page 的 txid (allocTxid, ok := f.allocs[p.id]); 如果获取不到且 page 为 freelist or meta,将 allocTxid 设置为当前 txid
  4. 将释放的连续页记录到 txPending 中: txp.ids = append(txp.ids, id); txp.alloctx = append(txp.alloctx, allocTxid))

是否与 allocate 对应 ?

  1. allocate(txid txid, n int)
  2. 分配连续的 n 个 pages,并返回第一个 page id (initial)
  3. 记录该 page id 被 txid 分配 (freelist.allocs[initial] = txid)

看起来 free 并不与 allocate 对应,即并不是 free 该 txid 的所分配的 pages 的语义,而是将连续页 (p *page) 加入到 txid 的 pending 记录中待释放;这么看来的话 pending [txid] -> txPending 好理解,然而 txPending 中未必只存储 [txid] 的 pending pages,这么实现应该与上层调用 free 方法的语义有关

最后看看 freelist 的 rollback 修改

1
2
3
4
5
6
7
8
9
10
11
12
13
14
15
16
17
18
19
20
21
22
23
24
25
26
27
28
29
30
// rollback removes the pages from a given pending tx.
func (f *freelist) rollback(txid txid) {
// Remove page ids from cache.
txp := f.pending[txid]
if txp == nil {
return
}
var m pgids
for i, pgid := range txp.ids {
delete(f.cache, pgid)
tx := txp.alloctx[i]
// tx == 0 ?!
if tx == 0 {
continue
}
// 非当前 rollback 的 tx 分配的 page
if tx != txid {
// Pending free aborted; restore page back to alloc list.
f.allocs[pgid] = tx
} else {
// Freed page was allocated by this txn; OK to throw away.
// 归还 freelist ids
m = append(m, pgid)
}
}
// Remove pages from pending list and mark as free if allocated by txid.
delete(f.pending, txid)
sort.Sort(m)
f.ids = pgids(f.ids).merge(m)
}

更好的回收策略?

https://github.com/coreos/bbolt/issues/14

总结

总之这个 pr 目测能极大缓解 etcd v3.1.9 中偶尔会遇到的 mvcc: database space exceeded 的错误,但是总感觉有些 page 还是没有及时回收的样子,这种没彻底弄清楚的感觉,合入总有点儿不放心 … 随意一说