k8s docker image cache
k8s 1.19
overview
阿里巴巴云原生这篇 pod 创建效率优化不错,e2e 分析了 docker pull 的加速技术
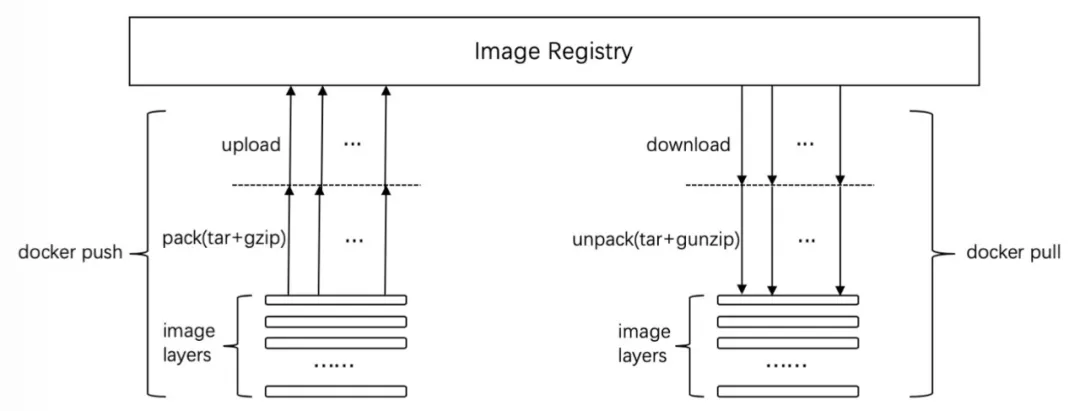
上图可见 docker pull 的几个阶段
- 下载
- 解压
- 将文件 union 为 rootfs (图中没写)
所以 docker pull 加速也从上述几个阶段入手
下载加速
p2p powered docker registry
Dragonfly is an intelligent P2P based image and file distribution system
Originally it was born to solve all kinds of distribution at very large scales, such as application distribution, cache distribution, log distribution, image distribution, and so on
https://github.com/uber/kraken
Kraken is a P2P-powered Docker registry that focuses on scalability and availability. It is designed for Docker image management, replication, and distribution in a hybrid cloud environment
all participants can reach a minimum of 80% max upload/download speed in theory (60% with current implementation), and performance doesn’t degrade much as the blob size and cluster size increase
提升 docker image 分发到节点(大规模)的速度,适合容器化服务发布/更新的场景
docker registry mirror
https://docs.docker.com/registry/recipes/mirror/
解压加速
https://kubernetes.io/docs/setup/production-environment/container-runtimes/
https://kubernetes.io/docs/setup/production-environment/container-runtimes/#containerd
gzip/gunzip 是单线程的压缩/解压工具,可考虑采用 pigz/unpigz 进行多线程的压缩/解压,充分利用多核优势。
containerd 从 1.2 版本开始支持 pigz,节点上安装 unpigz 工具后,会优先用其进行解压。通过这种方法,可通过节点多核能力提升镜像解压效率。
k8s 加速
docker images pull policy
https://kubernetes.io/docs/concepts/containers/images/#image-pull-policy
- Never
- IfNotPresent
- Always
Never,kubelet 会直接启动容器镜像;路径最短
IfNotPresent,local docker image list 查询是否命中,命中则启动容器镜像;未命中,走 docker pull;路径中等
Always,即使镜像没有变化,也会多一次 remote docker registry query 的查询时间;未命中,走 docker pull;路径最长
every time the kubelet launches a container, the kubelet queries the container image registry to resolve the name to an image digest. If the kubelet has a container image with that exact digest cached locally, the kubelet uses its cached image; otherwise, the kubelet pulls the image with the resolved digest, and uses that image to launch the container.
docker images pre-pulled
https://kubernetes.io/docs/concepts/containers/images/#pre-pulled-images
schedule imagelocality
https://kubernetes.io/docs/reference/scheduling/config/#scheduling-plugins
- imagelocality
注意到仅对 containers 生效,对 init containers 不生效;在 k8s sche 的 score 阶段有效,使用镜像大小作为 base score,即镜像大小越大,imagelocality 调度权重越高;当然为了避免 node heating problem,即由于 imagelocality 的策略,很可能 pod 的多个副本被调度到同一个节点,而其他节点没有有效利用上;因此最终 imagelocality score 的计算,还乘以了 image spread 的比例
1 | // scaledImageScore returns an adaptively scaled score for the given state of an image. |
如果 k8s cluster 中只有少量节点缓存了指定 image,则 spread 比例就会低,相应的 imagelocality score 得分也会低;反之,假若大多数 cluster nodes 都缓存了指定 image,则 spread 比例就会高,相应的 imagelocality score 得分也高
可见 k8s 设计之初还是侧重在服务管理,上述的调度策略也是对服务的高可用性友好的
1 | // calculatePriority returns the priority of a node. Given the sumScores of requested images on the node, the node's |
最后 imagelocality score 经过修正后,得到 image 在调度中的 priority;注意到 < minThreshold 的 score 都是一样的,物理意义上,就是说没有一个节点有缓存,和有少量节点有镜像缓存,在调度上的 priority 都是一样的,这样就避免了 node heating problem
node heating problem
https://oracle.github.io/weblogic-kubernetes-operator/faq/node-heating/
this often results in Kubernetes running many of the Pods for WebLogic Server instances on the same Node while other Nodes are not fairly utilized. This is commonly known as the “Node heating problem.”
k8s gc unused docker images
https://kubernetes.io/docs/concepts/architecture/garbage-collection/#containers-images
Kubernetes manages the lifecycle of all images through its image manager
The kubelet considers the following disk usage limits when making garbage collection decisions:
- HighThresholdPercent
- LowThresholdPercent
Disk usage above the configured HighThresholdPercent value triggers garbage collection, which deletes images in order based on the last time they were used, starting with the oldest first. The kubelet deletes images until disk usage reaches the LowThresholdPercent value.
docker image cache management
https://github.com/senthilrch/kube-fledged
kube-fledged is a kubernetes operator for creating and managing a cache of container images directly on the worker nodes of a kubernetes cluster
kube-fledged provides CRUD APIs to manage the lifecycle of the image cache
https://github.com/senthilrch/kube-fledged/blob/master/docs/design-proposal.md
按需加载文件
https://mp.weixin.qq.com/s/0OLdyVwg4Nsw0Xvvg8if5w
当前节点上创建容器时,是需要先把镜像全部数据拉取到本地,然后才能启动容器。再考虑下启动虚拟机的过程,即使是几百 GB 的虚拟机镜像,启动虚拟机也通常是在秒级别,几乎感受不到虚拟机镜像大小带来的影响。
《Slacker: Fast Distribution with Lazy Docker Containers》
该 paper 分析,在镜像启动耗时中,拉取镜像占比 76%,但是在启动时,仅有 6.4% 的数据被使用到,即镜像启动时需要的镜像数据量很少,需要考虑在镜像启动阶段按需加载镜像,改变对镜像的使用方式。
对于「Image 所有 layers 下载完后才能启动镜像」,需要改为启动容器时按需加载镜像,类似启动虚拟机的方式,仅对启动阶段需要的数据进行网络传输。
这个对现有架构的改动是很大了 …
https://developer.aliyun.com/article/742103
2020/01/08
summary
容器镜像启动加速技术
容器镜像
- 镜像文件下载加速
- docker registry mirror,本地 mirror,路程更近
- p2p (Dragonfly, Kraken),分发加速
- 镜像文件解压加速
- container runtime: containerd, unpigz,多线程解压
- 镜像文件按需加载
- Slacker: Fast Distribution with Lazy Docker Containers: Our analysis shows that pulling packages accounts for 76% of container start time, but only 6.4% of that data is read.
k8s
- imagePullPolicy
- Never,路径最短,依赖镜像预下载
- IfNotPresent
- Always
- schedule imagelocality: 调度优化,当集群中大多数节点均有缓存时,优先将 pod 调度到已有缓存的节点
- docker images pre-pulled + docker image cache management: 集群 docker image cache 管理
k8s 属于业务逻辑层面的优化